-
Whatsapp: +86 13526572721
-
Email: info@zydiamondtools.com
-
Address: AUX Industrial Park, Zhengzhou City, Henan Province, China
-
Whatsapp: +86 13526572721
-
Email: info@zydiamondtools.com
-
Address: AUX Industrial Park, Zhengzhou City, Henan Province, China

What Are the Best Cutting Tools for Machining a PCB Board?
So, what are the best cutting tools for machining a Printed Circuit Board, and how do you choose the right one?
The best cutting tools for machining a PCB are selected by matching the tool type to the specific task, material, and production goals. This involves understanding the primary tool categories (Tungsten Carbide, V-Groove Bits, Precision Drills, and PCD), matching them to the job (drilling, profiling, isolation, depaneling), considering the abrasiveness of the PCB material (from standard FR-4 to advanced composites), and knowing when to upgrade to high-performance options like PCD tools to maximize quality, uptime, and cost-effectiveness.
What Types of Tools Are Available for PCB Machining?
So, when it comes to machining a PCB, what are the actual tools available for the job?
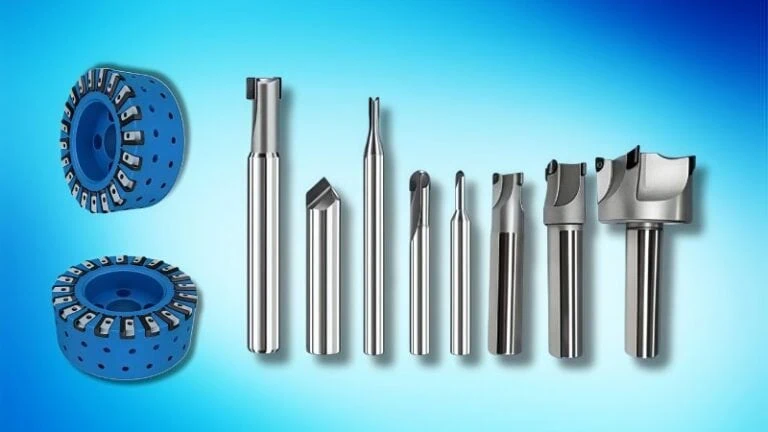
The primary tools available for machining a Printed Circuit Board (PCB) are Standard Tungsten Carbide tools, which serve as the baseline for general-purpose tasks; V-Groove Bits, specifically designed for engraving and scoring; Precision Drill Bits, engineered for creating clean vias and through-holes; and Polycrystalline Diamond (PCD) tools, an advanced option offering superior durability and performance.
Standard Tungsten Carbide Tools: The Baseline
When people talk about PCB cutting tools, they are most often referring to tools made from tungsten carbide. Think of tungsten carbide as the reliable workhorse of the PCB machining world. It is not a pure metal; rather, it’s a composite material made by combining hard tungsten carbide particles with a softer binder metal, usually cobalt. This combination creates a tool that is extremely hard and resistant to heat.
Consequently, these tools can spin at very high speeds without losing their sharp cutting edge quickly. They offer an excellent balance of performance and cost, making them the standard choice for everything from one-off prototypes in a lab to medium-volume production runs. However, while they are very hard, they are also brittle. This means they can chip or break if handled improperly or used with incorrect cutting parameters. Their primary limitation becomes apparent when machining highly abrasive PCB materials, where they can wear down relatively quickly.
V-Groove Bits for Engraving and Scoring
V-Groove bits, also known as V-bits or engraving bits, are easily identified by their sharp, V-shaped conical tip. Their specific geometry is not for drilling holes or cutting out board shapes, but for two very specific and important tasks:
- Circuit Isolation: In PCB prototyping, a V-bit is used to engrave away thin lines of copper from a blank board. This carves out conductive pathways, effectively isolating the traces and pads of your circuit design.
- Scoring for Depaneling: In production, multiple PCBs are often made on a single large panel. A V-bit is used to cut a shallow V-shaped groove between the individual boards. This weakens the panel along the groove, allowing the boards to be neatly and easily snapped apart later in a process called depaneling.
These bits come in various angles, such as 30°, 60°, and 90°. A smaller angle creates a finer, narrower cut, which is ideal for tightly packed circuit traces. Conversely, a wider angle is more robust and is often used for general-purpose scoring. Because the angle directly impacts the width and depth of the cut, it’s always a good practice to confirm the precise specifications with your tool supplier.
Precision Drill Bits for Vias and Through-Holes
Drilling holes in a PCB is a task that demands extreme precision. The drills used for this are not your standard hardware store drill bits. PCB drill bits are specialized micro-tools designed to create perfectly clean holes, often smaller than a grain of sand, without damaging the delicate layers of the board.
These holes, known as “vias,” are critical for connecting different layers of a multi-layered board, while other through-holes are used for mounting components.
Why Are They So Specialized?
PCB substrates like FR-41 are highly abrasive composites of fiberglass and epoxy. Drilling through this material is like drilling through very fine sandpaper—it generates a lot of friction, heat, and abrasive dust that can quickly dull a lesser tool. Precision PCB drills are therefore made from solid micro-grain tungsten carbide and feature a unique geometry, including a specialized point angle and deep flutes, to ensure:
- Clean Entry & Exit: They slice through the copper foil and substrate without tearing or leaving burrs.
- Efficient Debris Removal: The flute design quickly pulls the abrasive dust out of the tiny hole to prevent clogging and heat buildup.
- Positional Accuracy: They are engineered to minimize wandering and ensure the hole is drilled in the exact intended location.
An Introduction to PCD (Polycrystalline Diamond) Tools
While carbide is the standard, Polycrystalline Diamond (PCD) represents the pinnacle of cutting tool technology for demanding PCB applications. It is important to understand that PCD is not a solid, naturally occurring diamond. Instead, it is a sophisticated composite material.
Think of it like an advanced composite armor. Instead of one solid piece, it uses incredibly hard diamond particles fused together on a tough carbide base through a process called sintering. This combination gives it the best of both worlds: the extreme hardness of diamond and the strength of carbide.
The primary advantage of PCD is its unparalleled resistance to abrasive wear. When machining the glass fibers within FR-4 or other tough composites, a PCD router bit can often outlast a standard carbide bit by a factor of 50 to over 100 times, significantly reducing tool changes and machine downtime. This introduction only scratches the surface, as the decision to use PCD involves a deeper analysis of production volume and material challenges.
| Tool Type | Primary Material | Key Characteristic | Typical Application |
|---|---|---|---|
| Standard Tools | Tungsten Carbide (WC) | Good balance of hardness and cost | Prototyping, low-to-medium volume |
| V-Groove Bits | Tungsten Carbide (WC) | V-shaped tip for precise carving | Circuit engraving, board scoring |
| Precision Drills | Micro-grain Tungsten Carbide | Specialized geometry for small holes | Drilling vias and through-holes |
| PCD Tools | Polycrystalline Diamond | Extreme wear resistance & longevity | High-volume, abrasive materials |
How Do You Match the Tool to the Machining Task?
Now that you know the different types of tools, how do you choose the right one for your specific job?
To match a tool to a PCB machining task, you must select the right tool for the specific operation: use a micro-drill whose diameter matches the required hole size for drilling; choose a router or end mill with the correct flute design for profiling and cutouts; utilize a V-bit with an appropriate angle for circuit isolation; and for depaneling, select either a V-bit for scoring or a durable router for tab-routing.
For Drilling: Selecting the Right Micro-Drill
Selecting a drill isn’t just about matching the hole diameter. For PCBs, you must also consider the board’s thickness and material. This leads to a critical parameter known as the aspect ratio, which is the ratio of the board’s thickness to the drill’s diameter.
Imagine trying to drink a thick milkshake through a very long, very thin straw. It’s difficult because of the friction and the challenge of pulling the liquid all the way through. Drilling a tiny hole through a thick PCB presents a similar challenge. A high aspect ratio (e.g., drilling a 0.2mm hole in a 1.6mm thick board, an 8:1 ratio) requires a drill with a specific flute design that can effectively pull out the abrasive dust without breaking.
Key Selection Criteria:
- Hole Size: This is the most basic requirement. The drill diameter must match the design specification for the via or mounting hole precisely.
- Board Thickness (Aspect Ratio): For high aspect ratio holes, you need drills with shorter flutes and stronger web construction to prevent breakage. It’s wise to consult your tool supplier’s charts, as they provide specific drill series designed for different aspect ratios.
- Material: Drilling through standard FR-4 is different from drilling through a metal-core PCB. For harder or more abrasive materials, you may need a drill with a specialized coating or design to ensure a clean hole and reasonable tool life.
For Profiling and Cutouts: Choosing the Right Router or End Mill
Profiling is the process of cutting the final shape of the board out of the larger panel. This is done with tools broadly called routers or end mills. While the terms are often used interchangeably in the PCB world, they are designed with specific features that affect the quality of the board’s edge.
The most important feature to consider is the flute design. Flutes are the spiral grooves on the tool that evacuate chips and dust.
- Up-Cut Flutes: These pull chips up and away from the board. This is excellent for clearing debris but can cause slight fraying or “pull-up” on the top edge of the board.
- Down-Cut Flutes: These push chips down into the cut. This creates a perfectly clean top edge but can cause some fraying on the bottom edge. They are great for delicate surface work.
- Compression Flutes: This is the premium choice for a perfect finish. A compression bit has up-cut flutes on the bottom and down-cut flutes on the top. As it cuts, it squeezes the material towards the center, resulting in a flawless, smooth edge on both sides of the board.
For most PCB work, specialized “fish tail” or “diamond cut” routers are used. These have many small cutting edges that grind away the material rather than cutting it, which reduces stress on the board and results in a smoother finish on the abrasive fiberglass. The number of flutes (one, two, or four) also plays a role; fewer flutes can remove more material faster, while more flutes provide a smoother finish.
A Professional Tip: For standard 1.6mm FR-4, a two-flute diamond-cut router bit is a versatile and effective starting point for achieving a good edge finish without excessive cost.
For Circuit Isolation: Using V-Bits Effectively
As we covered earlier, V-bits are for engraving. When using them for circuit isolation, the most critical decision is choosing the right tip angle. The angle of the V-bit directly controls the width of the engraved line and, therefore, the spacing between your circuit traces.
This relationship is simple:
- A smaller angle (e.g., 30°) produces a narrower cut. This is necessary when you have very fine traces packed closely together.
- A larger angle (e.g., 90°) produces a wider cut. This is more forgiving and creates more clearance, which can be useful for higher voltage applications or less dense designs.
Think of it like writing with a pen. A fine-point pen (a small-angle V-bit) lets you write small and precisely. A broad-tip marker (a large-angle V-bit) creates a thick, bold line. Your choice depends entirely on how detailed your “writing,” or circuit design, needs to be. You must match the V-bit angle to the minimum clearance requirements specified in your PCB design software.
For Depaneling: Tools for V-Scoring and Tab-Routing
Depaneling is the final step where you separate individual boards from the master panel. There are two primary methods, each requiring a different tool approach.
| Depaneling Method | How It Works | Required Tool | Best For |
|---|---|---|---|
| V-Scoring | A V-bit cuts a shallow groove along a straight line on the top and bottom of the panel. The panel is then snapped along this weakened line. | V-Groove Bit | Panels with boards arranged in a simple grid; straight-line separations. |
| Tab-Routing | The boards are almost fully cut out with a router, but left attached to the panel by a few small tabs. These tabs are later broken or cut to free the board. | Router / End Mill | Boards with irregular or curved shapes; designs that cannot be laid out in a simple grid. |
The choice between these methods depends on your board’s design. If you are producing many identical rectangular boards, V-scoring is extremely fast and efficient. If your board is circular, L-shaped, or has connectors sticking out, tab-routing is the only viable method. The router bits used for tab-routing must be durable, as they perform a full-depth profile cut and must withstand the stress of cutting through the small, tough tabs. A specialized diamond cutting blade for PCBs is often preferred for this task due to its durability.
Why Does Your PCB Material Dictate Your Tool Choice?
Does the type of material your circuit board is made from really change the kind of cutting tool you need to use?
Yes, the PCB material is a critical factor in tool selection because different materials have vastly different properties. A tool that works well on standard FR-4 will wear out extremely quickly on high-glass content FR-4 due to increased abrasiveness. Furthermore, advanced materials like metal-core PCBs require tools that can cleanly cut both metal and dielectric layers simultaneously.
Machining Standard FR-4 Substrates
FR-4 is the most common material used for PCBs. Its name stands for “Flame Retardant, Class 4.” At its core, FR-4 is a composite material, created by weaving glass fibers together into a cloth, which is then impregnated with an epoxy resin binder. This creates a rigid, durable, and electrically insulating board, which is perfect for mounting electronic components.
From a machining perspective, standard FR-4 presents a baseline challenge. The glass fibers are abrasive and act like tiny files against the cutting tool’s edge, while the resin can melt or smear if too much heat is generated. For this reason, standard tungsten carbide tools are generally sufficient for prototyping and smaller production runs with this material. They provide an acceptable balance of tool life and cost when the abrasiveness is at this standard, predictable level.
The Challenge of Abrasive Materials like FR-4 with High Glass Content
Not all FR-4 is created equal. Many modern PCBs, especially in high-frequency applications like telecommunications or advanced computing, use a variation of FR-4 with a much higher density of glass fibers. This is done to improve the board’s electrical performance and structural stability.
However, this higher glass content dramatically changes the material from a machining standpoint.
Analogy: Cutting Drywall vs. Cement Board
Machining standard FR-4 is like cutting drywall. A standard utility knife works well enough for a while. Machining high-glass FR-4, however, is like trying to cut cement board with that same knife. The high concentration of hard particles will dull the blade almost instantly.
This intense abrasiveness causes several problems:
- Rapid Tool Wear: A standard carbide router that might last for hundreds of boards on standard FR-4 could be completely worn out after cutting just a few dozen boards made of high-glass FR-4.
- Poor Edge Quality: As the tool dulls, it stops cutting cleanly and starts rubbing or tearing the material, leading to a fuzzy, delaminated board edge.
- Excessive Heat: The increased friction generates more heat, which can melt the epoxy resin, causing it to smear and potentially compromising the integrity of the board.
Consequently, tackling these more abrasive materials effectively forces a move towards more wear-resistant tooling, as standard carbide is often no longer economically viable.
Cutting Advanced and Metal-Core PCBs (MCPCB)
The world of PCBs extends far beyond FR-4. Many modern electronics rely on advanced materials for thermal management or high-frequency performance, and each presents a unique machining puzzle.
Metal-Core PCBs (MCPCB)
Common in high-power LED lighting and power supplies, an MCPCB has a metal base, typically aluminum, designed to dissipate heat away from the components. Machining an MCPCB means you are cutting through multiple, very different layers at once: a top copper layer, a thin dielectric (insulating) layer, and a much thicker aluminum base.
This creates a dual challenge:
- The tool must be sharp enough to shear the soft, gummy aluminum without creating large burrs.
- The tool must also be hard enough to withstand the abrasive nature of the dielectric layer.
This often requires a special tool geometry, like a single-flute “O-flute” router, which is specifically designed for cutting soft metals cleanly, but made from a grade of carbide that can handle the abrasion.
Other Advanced Materials
Materials like Rogers, used in RF and microwave circuits, are softer and more thermally sensitive than FR-4. They require extremely sharp tools with specific geometries to avoid melting or smearing. On the other end of the spectrum, ceramic substrates, used in high-reliability modules, are incredibly hard but also very brittle. They cannot be machined with traditional tools and often require diamond-plated grinding tools to be shaped without causing fractures.
When working with these specialized and often expensive materials, it is essential to move beyond general recommendations and consult your tool supplier. They can provide critical guidance on the specific tool grade, geometry, and coatings that are proven to work best for that particular material.
When Should You Upgrade to PCD Diamond Tools?
So, when does it actually make sense to invest in the higher cost of a PCD diamond cutting tool?
You should upgrade to PCD diamond tools when your operation involves high-volume production where uptime is critical; when your boards demand a superior edge finish and tight dimensional tolerances consistently; when you are machining highly abrasive materials like high-glass content FR-4; or when your primary goal is to reduce the total cost-per-board in a fully automated production line.
For High-Volume Production and Maximizing Uptime
In a mass-production environment, like a factory producing thousands of server motherboards or automotive control units each day, the single biggest enemy is downtime. Every minute the CNC machine is stopped is a minute that boards are not being made, which directly translates to lost revenue.
Now, consider the process of changing a worn-out cutting tool. The machine must be stopped, the old tool must be carefully removed, a new tool must be installed and calibrated, and only then can production resume. If you are using standard carbide tools on an abrasive material, you might be repeating this process every couple of hours.
This is where PCD tools offer a transformative advantage. Because a single PCD router bit can last dramatically longer than its carbide counterpart, the frequency of these time-consuming tool changes plummets.
Industry Case Study: Automotive Electronics
An automotive electronics manufacturer running a 24/7 production line found they were changing carbide router bits every 90 minutes, resulting in nearly 2 hours of lost production time per machine each day. After switching to PCD routers, tool changes were reduced to once every few days. This single change increased their effective production output by over 10% and significantly reduced operator intervention.
Therefore, for high-volume manufacturing, the decision becomes simple. The upfront cost of the PCD tool is quickly offset by the massive gains in machine uptime and throughput.
When Demanding Superior Edge Finish and Tight Tolerances
For some industries, quality and consistency are more important than raw speed. Think about mission-critical electronics used in aerospace, medical devices, or military applications. For these products, a small flaw in the PCB edge, called delamination, or a slight deviation from the specified dimensions can lead to catastrophic failure.
A brand-new carbide tool might produce a perfect board. However, as it begins to wear—which can happen quickly—the quality of its cut starts to degrade. The 1st board looks great, the 50th looks acceptable, but the 100th may have a fuzzy edge and be slightly out of tolerance. This inconsistency is a major problem for quality control.
PCD tools solve this issue due to their exceptional hardness. A PCD cutting edge wears down incredibly slowly and evenly. This means it delivers a consistently clean, sharp cut from the first board to the ten-thousandth. This allows manufacturers to maintain tight dimensional tolerances (e.g., +/- 0.05mm) and a perfect edge finish across an entire production batch, ensuring every single board meets the most stringent quality standards.
To Drastically Extend Tool Life on Abrasive Materials
As we discussed earlier, some PCB materials are inherently hostile to cutting tools. High-glass content FR-4, ceramics, and certain composite materials used in 5G antennas are so abrasive that they can destroy a standard carbide tool in minutes. In these situations, using carbide is often impractical.
This is not a matter of small improvements; it’s a fundamental change in capability. The extreme hardness of the diamond particles in a PCD tool makes it uniquely suited to withstand this intense abrasion. The performance difference is stark and easily measurable.
Performance on High-Glass Content FR-4
- Standard Carbide Router: Typically achieves a cutting distance of 20-50 linear meters before tool failure.
- PCD Router: Can achieve a cutting distance of 2,000-5,000 linear meters under the exact same conditions.
When you are working with these advanced, abrasive materials, upgrading to PCD is often not just an option, but a necessity to make production feasible at all.
For Reducing Overall Cost-Per-Board in Automated Lines
Finally, smart financial decisions in manufacturing are based on the Total Cost of Ownership (TCO)2, not just the initial purchase price. A cheaper tool can often be the more expensive choice in the long run. The true cost of machining a single PCB is a combination of several factors.
Let’s compare the real costs associated with using a carbide tool versus a PCD tool in a fully automated production line.
| Cost Factor | Standard Carbide Tool | PCD Diamond Tool | Impact on Overall Cost |
|---|---|---|---|
| Initial Purchase Price | Low | High | PCD has a higher initial investment. |
| Tool Life | Short | Very Long | PCD produces vastly more boards per tool. |
| Machine Downtime | High (frequent changes) | Very Low (infrequent changes) | PCD significantly increases productive machine hours. |
| Scrap Rate | Increases as tool wears | Consistently Low | PCD reduces waste from boards cut with a dull tool. |
| Labor Cost | High (frequent operator intervention) | Very Low | PCD frees up operator time for other tasks. |
| Effective Cost-Per-Board | High | Very Low | PCD delivers a much lower true cost for each finished board. |
As the table clearly shows, while the PCD tool costs more upfront, its incredible longevity and the resulting reduction in downtime, scrap, and labor make it the far more economical choice for any serious, automated production environment. The upgrade directly leads to a lower, more competitive cost-per-board.

What Are Common Mistakes That Cause Poor Results?
Even with the perfect tool, what common errors can still lead to poor results when machining a PCB?
The most common mistakes that cause poor results in PCB machining are using incorrect speeds and feeds, which can either break the tool or cause heat damage; ignoring the signs of tool wear and tear, leading to degraded quality and potential machine damage; and having inadequate debris and dust extraction, which accelerates tool wear and ruins edge finish.
Using Incorrect Speeds and Feeds
Every cutting operation involves two critical parameters: speed and feed. Getting the balance between these two right is essential for a clean cut and good tool life.
- Speed (Spindle Speed): This is how fast the cutting tool is rotating, measured in Revolutions Per Minute (RPM).
- Feed (Feed Rate): This is how fast the machine is moving the cutting tool across the surface of the board, measured in millimeters or inches per minute.
What happens when the balance is wrong?
- Feed Rate Too High: Pushing the tool through the material too quickly puts immense stress on the bit. This is the number one cause of broken tools, especially with fragile micro-drills and small-diameter routers.
- Feed Rate Too Low (or Speed Too High): If the tool is spinning very fast but moving forward too slowly, it stops cutting effectively and starts rubbing against the material. This generates a tremendous amount of friction and heat, which can melt the board’s epoxy resin, cause ugly burrs, and rapidly dull the cutting edge.
A Critical Reminder: There is no single “perfect” setting. The ideal speeds and feeds depend on the tool’s diameter, the type of tool, the specific PCB material, and the rigidity of your CNC machine. Always start with the recommended parameters provided by your tool supplier. Use these as a safe baseline, and then make small adjustments to optimize for your specific setup.
Ignoring Tool Wear and Tear
Cutting tools are consumables; they are designed to wear out. A common mistake, especially in smaller shops, is trying to push a tool long past its effective lifespan to “get your money’s worth.” This is a false economy that almost always costs more in the long run.
Tool wear is not usually a sudden event. It is a gradual process. You need to learn to spot the signs of a dulling tool:
- A noticeable increase in burring or “fuzz” along the cut edge.
- Delamination, where the layers of the PCB start to separate at the edge.
- A change in the sound of the machine—a dull tool often sounds louder or starts to “squeal” as it labors to cut.
- Visible chipping or rounding on the tool’s cutting edge when inspected under magnification.
Why You Can’t “Just Push Through”
Continuing to use a worn tool does more than just produce bad boards, which increases your scrap rate. A dull tool puts a much higher mechanical load on the CNC machine itself. It forces the spindle motor to work harder, which can lead to overheating and premature failure of the spindle bearings—a very expensive repair that can put a machine out of commission for days. Regularly inspecting and replacing worn tools is one of the most important preventative maintenance tasks you can perform.
Inadequate Debris and Dust Extraction
The dust created when machining a PCB is not harmless. It is a cloud of fine, highly abrasive glass and epoxy particles. A powerful and properly functioning vacuum or dust extraction system is not an optional accessory; it is essential for quality work.
When debris extraction is poor, two major problems occur:
- Chip Recutting: Dust and chips that are not immediately removed from the cutting path get run over and cut again by the tool. This is called “chip recutting.” Because the dust is so abrasive, this process dramatically accelerates the dulling of the cutting tool.
- Heat Buildup: The pile of debris traps heat right at the point where the tool is cutting. This trapped heat can easily become intense enough to melt the epoxy resin, leading to a smeared, messy cut and further contributing to tool wear.
An inefficient dust extraction system is like forcing the machine to work in a cloud of sandpaper. For a tool to perform at its best and last as long as possible, it needs a clean environment where it can cut fresh material with every rotation. Ensuring your vacuum system is powerful, the nozzle is positioned correctly, and the filters are clean is just as important as choosing the right tool.
Conclusion
Choosing the best cutting tool for machining a PCB is not about finding a single “magic bullet,” but about making a series of smart, informed decisions. By understanding the fundamental tool types available—from standard carbide to advanced PCD—you can build a solid foundation. The next crucial step is to analyze your specific needs: matching the tool’s design to the task at hand, whether it’s precision drilling or high-speed profiling, and respecting the profound impact that the PCB material itself has on tool performance and longevity.
Ultimately, a strategic approach to tooling saves more than just money. It saves time by maximizing uptime, improves quality by ensuring consistency, and prevents the common mistakes that lead to scrap and frustration. By considering the entire machining ecosystem—the tool, the task, the material, and your operational goals—you empower yourself to achieve faster, cleaner, and more cost-effective results.
References
- FR-41 – The Wikipedia entry for FR-4, providing a comprehensive overview of this common PCB substrate material.
- Total Cost of Ownership (TCO)2 – A guide from ZYDiamondTools explaining the concept of TCO specifically for superhard tooling and abrasives.