-
Whatsapp: +86 13526572721
-
Email: info@zydiamondtools.com
-
Address: AUX Industrial Park, Zhengzhou City, Henan Province, China
-
Whatsapp: +86 13526572721
-
Email: info@zydiamondtools.com
-
Address: AUX Industrial Park, Zhengzhou City, Henan Province, China

How to True a Diamond Grinding Wheel

What is the correct way to true a diamond grinding wheel?
To true a diamond grinding wheel, you must first restore its geometric shape (truing) using a brake device or silicon carbide stick with light infeed passes. Immediately after, you must clean the wheel’s surface (dressing) with an aluminum oxide stick to re-expose the sharp diamond grits so it can cut.
The Difference Between Truing and Dressing
“Truing” is a machining process that restores the wheel’s perfect geometric shape, making it round and concentric with the spindle. In contrast, “dressing” is a cleaning process that removes loaded material (clogging) or worn-out bond, exposing fresh, sharp diamond grits so the wheel can cut efficiently again.
Understanding this difference is the most critical part of the entire job. Using the wrong process at the wrong time will, at best, fail to fix your problem and, at worst, damage your expensive diamond wheel or your workpiece.
Truing = Fixing the Shape (Fixing Runout/Vibration)
You need to “true” a wheel when it is no longer geometrically perfect. This happens when the wheel develops runout1, meaning it is no longer perfectly round or concentric with the machine’s spindle.
Think of it this way: even a tiny 0.001-inch (0.025 mm) high spot on the wheel’s surface will hit the workpiece first and harder on every single revolution. This uneven impact is the source of many grinding problems.
You know your wheel needs truing if you experience:
- Vibration or “Chatter”2: This is the most common sign. The machine will make a “hammering” sound, leaving a wavy, unacceptable pattern on your part’s surface.
- Inaccuracy: You simply cannot hold tight tolerances. If the wheel isn’t perfectly round, your part won’t be either.
- Tapered Parts: The wheel face itself may have worn unevenly, causing it to grind a taper or profile you didn’t intend.
Therefore, truing is the act of machining the entire wheel face to make it perfectly round and straight again. It is a geometry-correcting operation.
Dressing = Fixing the Sharpness (Fixing Glazing/Loading)
A wheel can be perfectly true (round) but still refuse to cut. Why? Because the sharp diamond grits that do the work are covered up. This dull state is usually caused by one of two conditions:
- Loading: The gaps between the diamond grits get clogged with the swarf (grinding debris) from the material you are grinding. This is just like a metal file getting caked with aluminum chips—the teeth are still there, but they can’t reach the workpiece.
- Glazing: The sharp points of the diamonds themselves wear down, or the bond (the “glue” holding the diamonds) melts or smears over the grits from excessive heat. The wheel becomes smooth, shiny, and just rubs against the part instead of cutting.
When your wheel is glazed or loaded, it will generate extreme heat, “bounce” off the material, and often burn the workpiece.
Dressing3 is the act of cleaning the wheel. It uses a softer abrasive (like an aluminum oxide stick) to gently scrub away the loaded swarf and erode just enough of the bond to re-expose the sharp, new diamond points underneath.
The Golden Rule: Always True Before You Dress
This brings us to the most important rule of wheel preparation, which you must follow every time:
You must always true the wheel first, and then dress it.
This sequence is mandatory. The truing process (which we will cover in the next section) is an aggressive action. While it makes the wheel round, it also smears the bond and dulls the diamond grits, leaving the wheel in a glazed state.
Think of it as a two-step process:
- True: You fix the wheel’s foundation and geometry.
- Dress: You sharpen the wheel by exposing its cutting edges.
If you dress a wheel that isn’t true, you are just sharpening a lumpy, vibrating tool. You will still get chatter and a poor finish. If you true a wheel and forget to dress it, the wheel will be perfectly round but will not cut, and you will immediately burn your part.

What is the Step-by-Step Truing Process?
Now that you know the “what” and “why,” how do you actually perform the truing operation safely and correctly?
The truing process involves six main steps: 1) Select the correct truing tool, such as a brake device or silicon carbide stick. 2) Securely mount the tool to ensure a rigid setup. 3) Set the correct wheel speed and apply coolant. 4) Apply a very light infeed, just “kissing” the wheel. 5) Traverse the tool smoothly across the wheel’s face. 6) Immediately dress the wheel afterward to re-expose the sharp diamonds.
This procedure is a high-precision machining operation. Following these steps in order is critical to both restoring your wheel and protecting your investment.
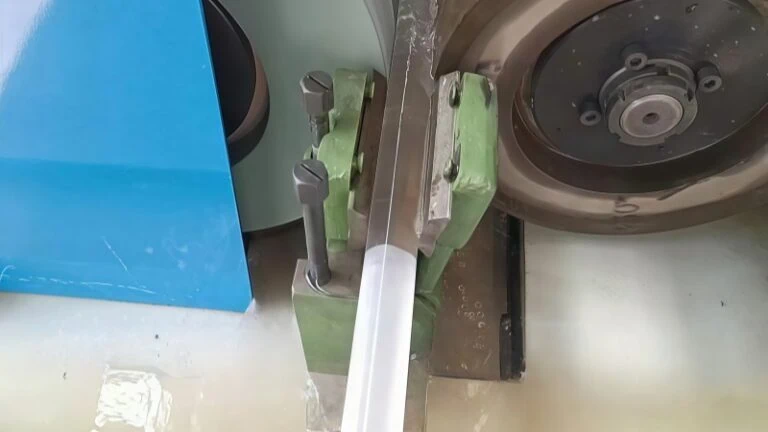
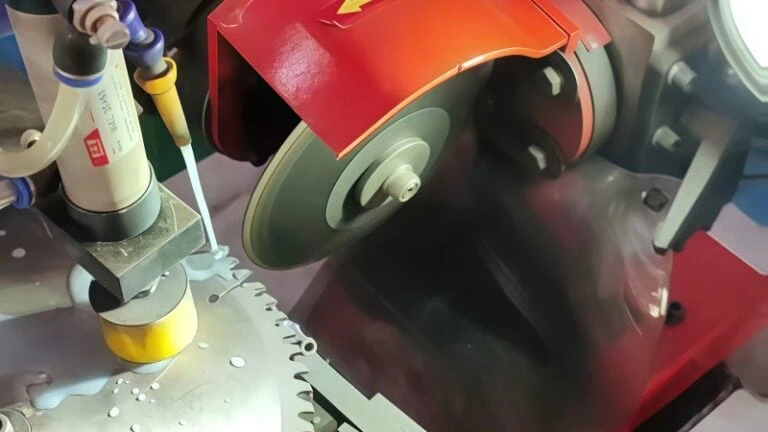
Step 1: Select the Correct Truing Tool (Brake Device or SiC Stick)
Your first choice is what tool you will use to true the wheel. Because diamond is the hardest material, you must use a tool that creates significant friction and abrasion. The two most common and effective tools are:
| Tool Type | How It Works | Best For |
|---|---|---|
| Brake-Controlled Truing Device | This is a small, precision grinding wheel (usually silicon carbide) on a spindle. When the diamond wheel spins it, an internal brake is applied to the device. This speed difference creates the abrasive “slip” needed to true the diamond wheel. | High-precision surface grinders. It provides the most accurate, flat, and concentric result because it is a controlled, on-machine process. |
| Silicon Carbide (SiC) Stick4 | This is a very hard, abrasive stick (often black or green). It is clamped in a rigid fixture and fed into the spinning diamond wheel. | Quick touch-ups or less critical applications. It is faster to set up but relies more on operator skill and the rigidity of the fixture. |
For most professional grinding, the brake-controlled device is the standard. We will focus on that process, but the same principles apply if you are using a fixtured SiC stick.
Step 2: Ensure a Rigid Setup (Mounting the Tool Securely)
This step is the foundation of a good truing operation. Any vibration or looseness in your setup will be directly transferred into the wheel face, defeating the entire purpose.
- Mount the Device: Securely mount your brake-truing device directly to your magnetic chuck or bolt it to the machine table. The setup must be as rigid as the machine itself.
- Analogy: Think of it like trying to use a cutting tool in a lathe that is loose in the toolpost. The tool will just chatter and bounce, leaving a terrible finish. The same thing will happen if your truing device can vibrate.
Step 3: Set Wheel Speed and Apply Coolant (If Applicable)
- Wheel Speed: You will typically true the wheel at its normal operating speed (Surface Feet per Minute, or SFM). However, some wheel and truing device combinations work better at a slower or different speed.
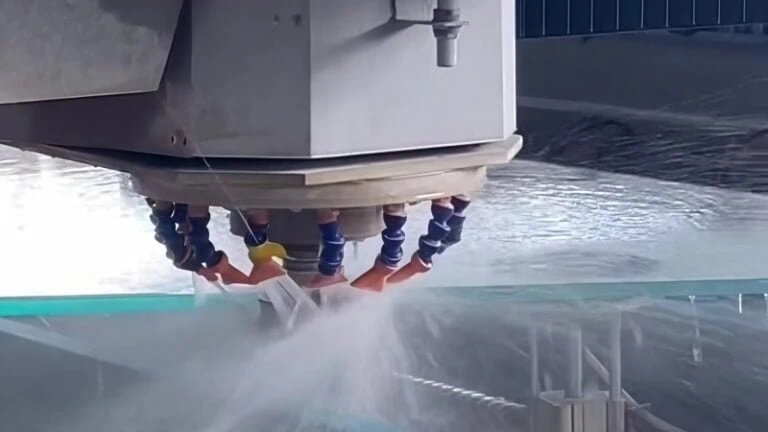
- Coolant: Coolant is critical. Turn on your flood coolant and ensure it is aimed directly at the contact point between the wheel and the truing device. This does two things:
- It controls the fine abrasive dust.
- It prevents the wheel’s bond from overheating and “smearing,” which would damage the wheel.
Professional Tip: Always check the recommendations from both your grinding wheel manufacturer and your truing device supplier. They will provide the exact speed (RPM) and coolant parameters for your specific combination.
Step 4: Use a Very Light Infeed (The “Kissing” Pass)
You are not trying to remove a lot of material quickly. You are trying to find the single highest point on the wheel and bring all other points down to that level.
- With the wheel spinning and coolant on, slowly bring the truing device up (or in) until you just barely hear or see it make contact. This is the “high spot.”
- Back it off slightly, move to one side, and then set your infeed for the first pass.
- This first pass should be extremely light. An infeed of $0.0002$ to $0.0005$ inches ($0.005$ to $0.013$ mm) is common. A heavy infeed will fracture the diamonds and shorten the wheel’s life.
Step 5: Traverse the Tool Across the Wheel Face
Once your light infeed is set, begin your traverse. This is the cross-feed motion that moves the truing device across the entire face of the diamond wheel.
- Speed: Use a slow, steady, and consistent traverse speed.
- Action: Move the truing device all the way across the wheel face and then all the way back. Do not stop the traverse in the middle of the wheel, as this can grind a low spot (a “dish” or line) into the face.
- Repeat: You may need to make several full passes, applying another tiny infeed (like $0.0002$ in.) for each one. Continue until the truing device is making contact and “cleaning up” $100\%$ of the wheel face. When the sound is consistent across the entire pass, the wheel is perfectly true.
Step 6 (Essential Final Step): Dress the Wheel to Re-expose Diamonds
Your wheel is now perfectly round, but it is also $100\%$ DULL.
The truing process you just completed has smeared the metal or resin bond over the sharp points of the diamonds. If you try to grind with the wheel in this state, it will just rub, generate massive heat, and burn your part.
You must now dress (sharpen) it.
- Get the Right Tool: For this, you will use a different, softer tool: a white aluminum oxide dressing stick5.
- Apply the Stick: With the wheel still spinning (coolant on), gently press the aluminum oxide stick against the wheel face by hand.
- The Goal: This softer stick does not change the wheel’s shape. Its only job is to scrub away that thin, smeared bond layer. This re-exposes the sharp, fresh diamond grits, making the wheel ready to cut.
You will only need to do this for a few seconds. You will feel the wheel “bite” into the stick, and the sound will change from a smooth hum to a sharper, “crisp” cutting sound. Your wheel is now true, dressed, and ready to grind.
What Are the Most Common Mistakes to Avoid?
You’ve followed the steps, so what could go wrong?
The most common and costly mistakes are: 1) Using the wrong tool, especially a single-point diamond dresser. 2) Applying too much infeed pressure, which damages the wheel. 3) Forgetting the final dressing step, which leaves the wheel unable to cut. 4) Running the wheel at an incorrect speed.
Avoiding these few pitfalls is just as important as the truing process itself. An expensive diamond wheel can be damaged in seconds by a simple mistake.
Mistake 1: Using the Wrong Tool (NEVER Use a Single-Point Dresser)
This is the single most destructive mistake a new operator can make.
A single-point diamond dresser (the common tool with one diamond at the tip) is designed only for conventional wheels like aluminum oxide or regular silicon carbide. In that case, the diamond tip is much harder than the wheel, so it “plows” a new surface.
Here’s the problem: what happens when you try to cut a diamond with a diamond?
It’s like trying to sharpen a file with another file. They are the same hardness. Instead of a clean cut, they will just chatter and chip each other. Using a single-point dresser on a diamond wheel will:
- Fracture or destroy the diamond tip on your dresser.
- Rip the diamond grits out of your expensive grinding wheel.
- Fail to true the wheel, and in fact, will likely make the runout worse.
This is why we abrade a diamond wheel (with a SiC stick or brake device) and never cut it (with a single-point dresser).
Mistake 2: Applying Too Much Pressure or Infeed
Patience is key. The goal of truing is to “kiss” the high spots, not to machine the whole wheel down.
When you apply too much infeed (e.g., $0.001$ inches or $0.025$ mm instead of $0.0002$ inches or $0.005$ mm), you are asking the truing tool to do the work of a cutting tool. The diamond wheel’s bond is not designed for that.
- Analogy: This is no different from taking a cut on a milling machine that is too deep. The tool will chatter, the part will have a terrible finish, and you risk breaking the endmill.
- The Result: Excessive pressure will fracture the diamond grits and can rip them entirely out of the bond. This not only “trues” the wheel but also “guts” it, drastically shortening its usable life. Stick to tiny, light passes.
Mistake 3: Forgetting to Dress After Truing
We covered this in the last step of the process, but it is so important it’s also listed as the most common failure.
Operators often get a perfectly round, smooth wheel from truing and think the job is done. They then try to grind their part and are horrified when the part immediately burns and the wheel refuses to cut.
Why? The truing process, by its very nature, smears the bond over the diamond points, leaving the wheel glazed and “dull.”
Think of it like this: truing gets the shape right, but dressing gets the sharpness right. Forgetting to dress is like sharpening a knife and then leaving the burr on the edge. The knife is the right shape, but it won’t cut cleanly. Your wheel needs that final “scrub” with an aluminum oxide stick to expose the cutting points.
Mistake 4: Running the Wheel at the Wrong Speed
The speed of the wheel (RPM, which translates to Surface Feet per Minute, or SFM) is not a guess; it’s a critical parameter.
- Running Too Fast: This can generate excessive heat during the truing process, which can damage the wheel’s bond (especially resin bonds)6. In a worst-case scenario, it can exceed the wheel’s safety rating.
- Running Too Slow: This is less dangerous but highly inefficient. The truing device (especially a brake-controlled type) is engineered to work within a specific “slip” ratio. If the wheel spins too slowly, the device may not abrade the surface properly, and you will just be wasting time.
Guideline: The correct RPM for truing is not always the same as for grinding. This speed is set by the wheel manufacturer and depends on the wheel’s diameter and bond type. Always check the manufacturer’s documentation or the wheel’s blotter (label) before you start.
Conclusion
Truing a diamond wheel is a process of precision. By understanding the critical difference between truing (restoring shape) and dressing (restoring sharpness), you can avoid the most common and costly mistakes.
Following the correct step-by-step process—using the right tools, ensuring a rigid setup, and applying patient, light infeeds—will successfully restore your wheel’s geometry. Most importantly, always finish the job by dressing the wheel with an aluminum oxide stick. This essential final step ensures your perfectly true wheel is also ready to cut, guaranteeing accurate parts and extending the life of your valuable wheel.
- runout1 – Wikipedia article explaining the concept of run-out in mechanical engineering.
- Vibration or “Chatter”2 – Wikipedia article detailing the causes and effects of machining vibrations, commonly known as chatter.
- Dressing3 – ZYDiamondTools’ practical how-to guide on the process and importance of dressing a diamond wheel.
- Silicon Carbide (SiC) Stick4 – ZYDiamondTools product category page for abrasive oil stones and sticks, including Silicon Carbide options.
- white aluminum oxide dressing stick5 – ZYDiamondTools product page for White Aluminum Oxide (WA) dressing sticks, used for dressing diamond wheels.
- wheel’s bond (especially resin bonds)6 – ZYDiamondTools’ detailed explanation of different grinding wheel bond types, including resin, and how to select them.